The General Settings page allows you to configure your live stream schedule and choose what displays when you are not live. This is the first place to set up after activating CP Live.
Accessing General Settings
- Log in to your WordPress admin dashboard
- Navigate to Settings → CP Live
- The Main tab is selected by default
Display Options
When Not Live
Choose what visitors see when no live stream is active:
- Show most recent video: Displays the last detected video embed from your streaming service
- Show countdown to the next stream: Displays a countdown timer to your next scheduled service time
Live Stream Schedules
Schedules tell CP Live when to check for live streams. You can add multiple schedules to cover all your regular service times.
Adding a Schedule
- Click Add Another Schedule to create a new schedule entry
- Configure the following fields:
| Field | Description |
|---|---|
| Force Live | When checked, automatically sets your site to “live” at the scheduled time, even if no stream is detected from your provider |
| Day | The day of the week for this schedule (Sunday through Saturday) |
| Time | The time your service starts. You can add multiple times per day by clicking the + button |
Example Configuration
For a church with Sunday services at 9:00 AM and 11:00 AM, and a Wednesday evening service at 7:00 PM:
- Create a schedule for Sunday with times 9:00 AM and 11:00 AM
- Create a second schedule for Wednesday with time 7:00 PM
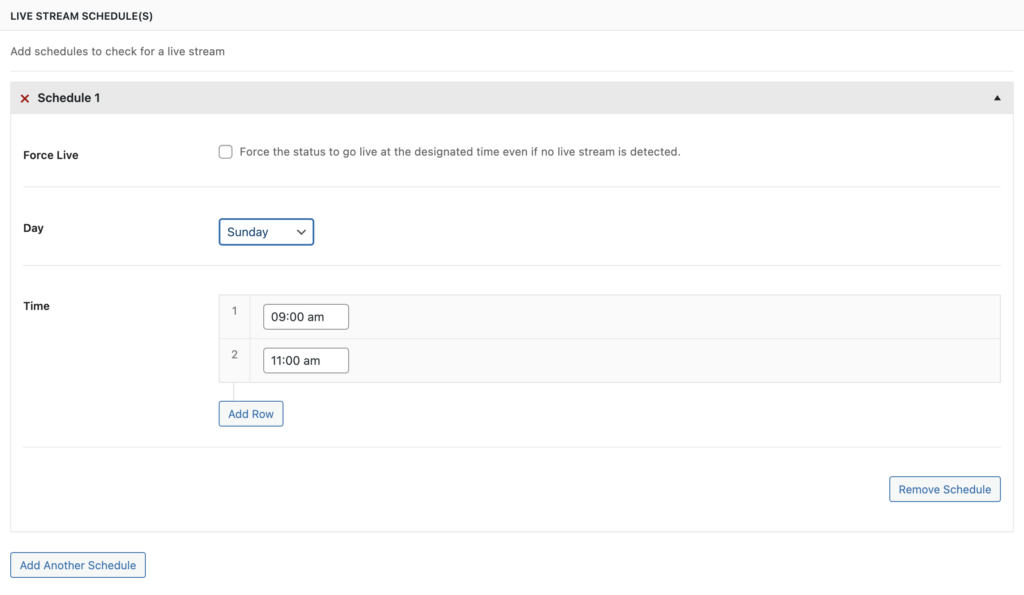
Removing a Schedule
Click Remove Schedule on any schedule entry to delete it.
Applying Settings
- Click Save Changes at the bottom of the page
- The page refreshes with a confirmation message
Troubleshooting
If your schedules are not working as expected:
- Verify your WordPress timezone is set correctly in Settings → General
- Check that WP-Cron is functioning on your hosting environment
- Adjust the buffer settings in Advanced Settings if streams are being missed
For more help, see the Troubleshooting guide.